
Beautiful Ballerina Paper Craft DIY for Dancers
Papercraft Ballerina for Kids: A Delightful DIY Project
Crafting is a wonderful way to engage children's creativity, improve their fine motor skills, and spend quality time together. One enchanting project that captures the grace and beauty of ballet is the papercraft ballerina. This simple yet elegant ballerina papercraft DIY craft is perfect for little girls who love to dance, dream, or simply enjoy creating something beautiful with their hands. Whether you're looking for a rainy day activity or a themed craft for a ballet birthday party, making a papercraft ballerina is sure to be a hit.

Beautiful Ballerina Paper Craft DIY for Dancers
This ballerina inspired papercraft is an engaging project that combines various materials, making it a perfect activity for children. It helps develop fine motor skills and offers a fun, hands-on experience. A papercraft ballerina can serve as a delightful decoration or even a creative team-building activity for ballet-themed events. Whether it's for a ballet recital, birthday party, or ballet class, these charming paper creations can be strung together to make garlands, displayed as table centerpieces, or used to decorate walls and windows. Each ballerina can be personalized with different colors, designs, and unique details, allowing participants to showcase their individuality. As a team-building activity, this craft encourages collaboration, creativity, and communication. Ballet students or friends can work together to design and assemble their ballerinas, fostering a sense of teamwork while celebrating their shared love of dance. This activity is not only fun but also strengthens bonds and adds a beautiful, personal touch to any ballet-themed space.

Paper dolls have a rich and fascinating history that dates back to the early 18th century. Originally used as fashion illustrations and playthings for children, paper dolls became popular in Europe and later spread to America. They were often hand-painted and intricately designed, reflecting the fashion trends and societal norms of their time. In the 19th century, paper dolls became more widely accessible with the advent of mass printing, making them a beloved toy for children across different social classes. Beyond mere entertainment, paper dolls were also used as educational tools, teaching children about fashion, culture, and storytelling. Over the centuries, they evolved to include a variety of themes, from famous historical figures to fictional characters, and became cherished collectibles. Today, paper dolls continue to inspire creativity and nostalgia, connecting generations through a simple yet timeless craft.
Any ballerina would absolutely love this great craft to do alone or as a great way to bond with friends or other dancers.

Supplies for Ballerina Craft
as an amazon associate, I earn a small commission based on purchases made through the following affiliate links at no additional cost to you.
colored craft papers
glue
scissor
pencil
red and black markers
cotton
If kids want to differentiate their ballerina's tutu, you can also use coffee filters or cupcake liners to have a variety of ballerina's tutus options!
Instructions for this Paper Ballerina Craft
step 1: download the ballerina template printable and cut out the different shapes for this easy ballerina craft.

step 2: trace the cutout shapes from the printable onto the corresponding colored craft paper and cut out each of them.

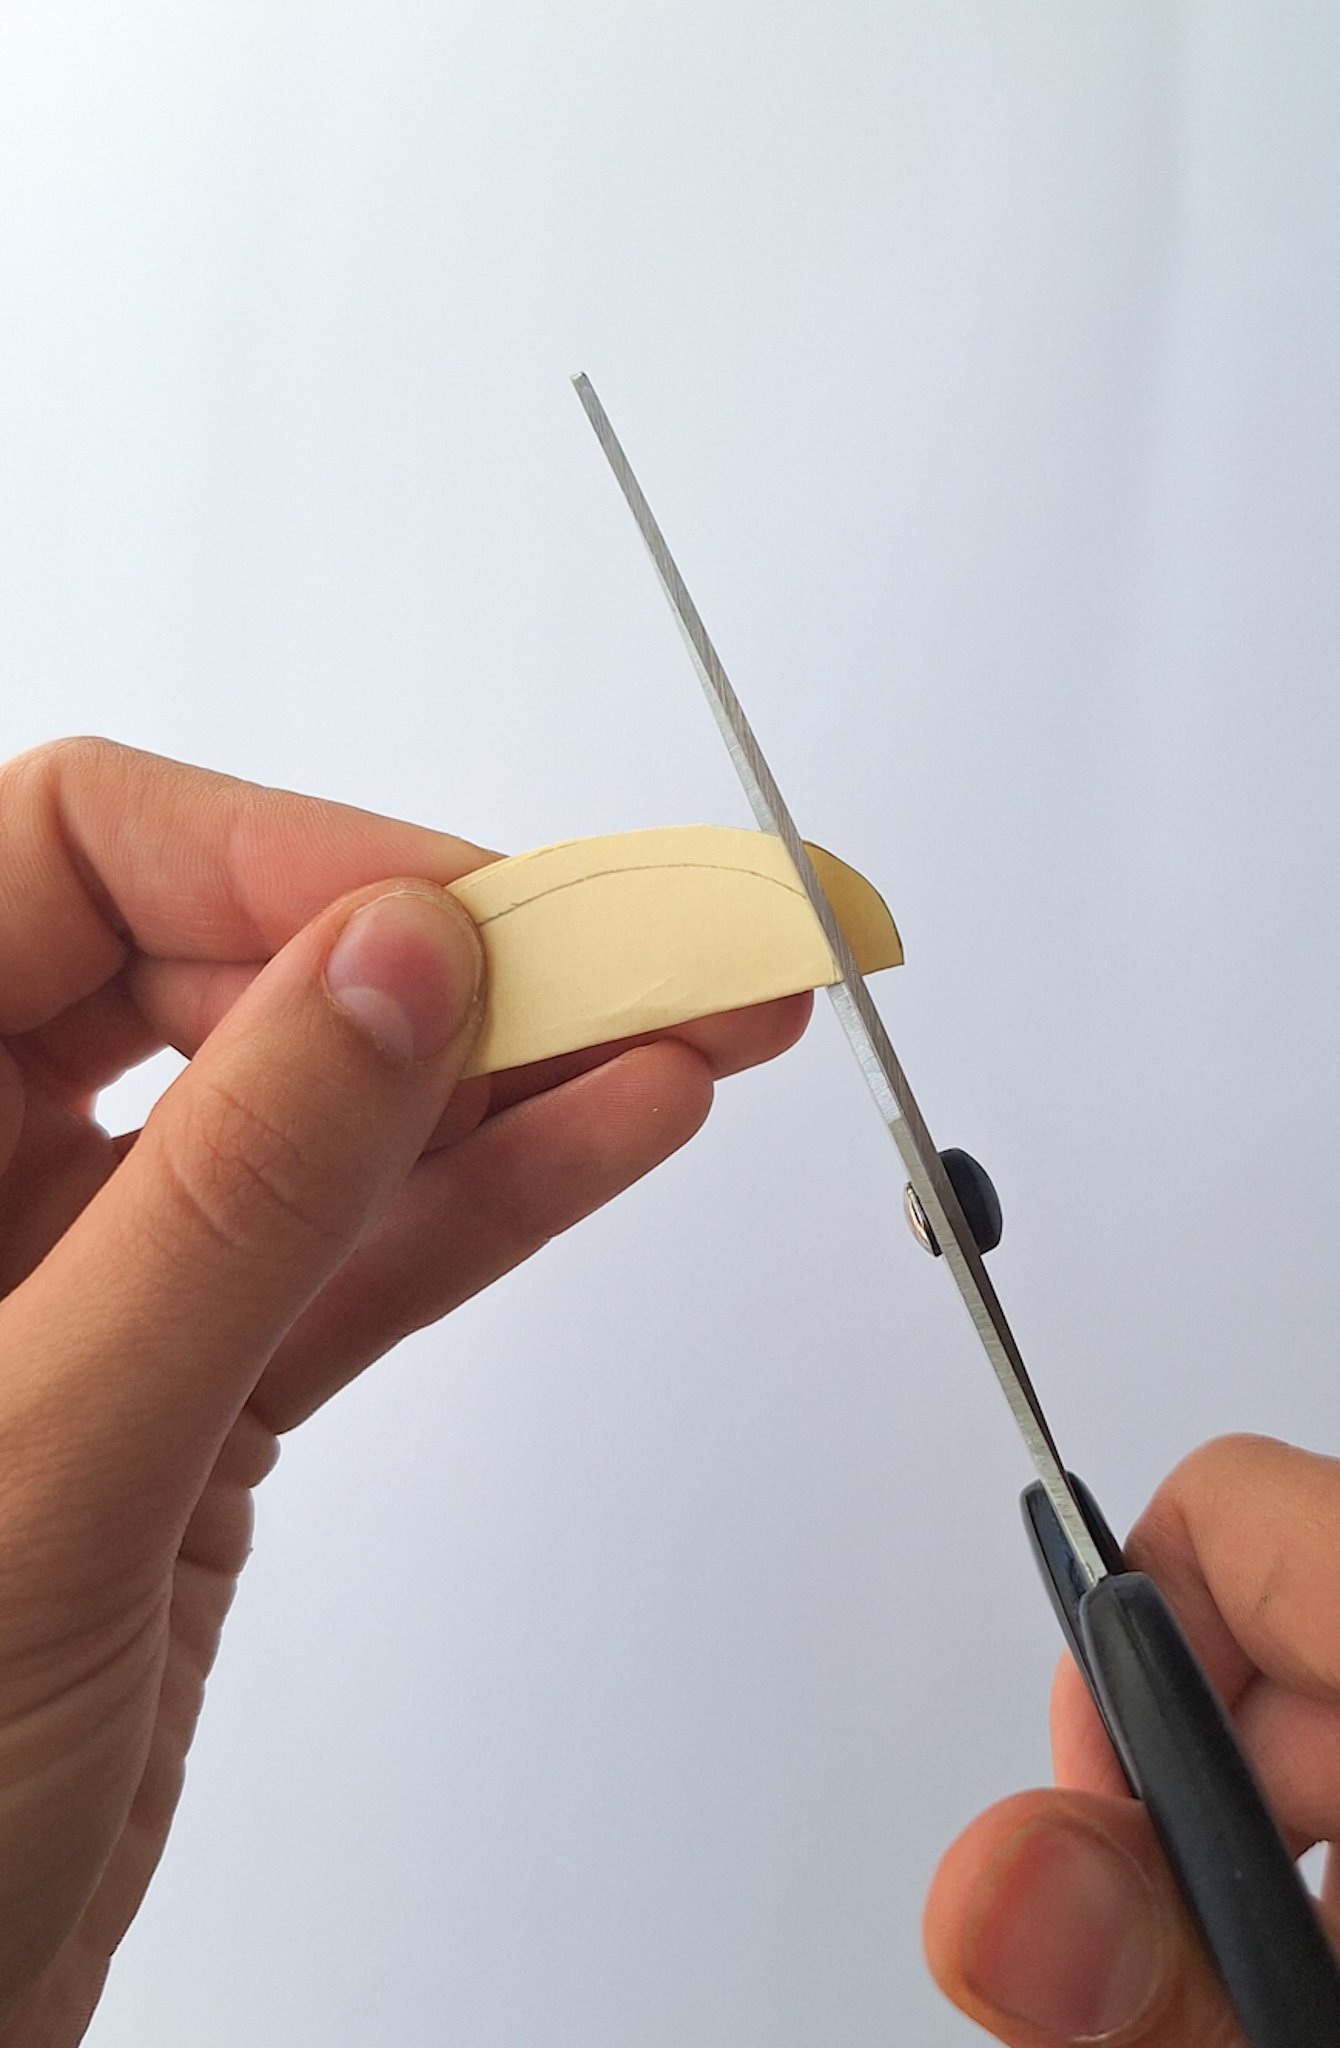
step 3: for the ballerina’s arms, fold the oval shape in half and cut out a half moon shape. Then, unfold it, and they will be ready.


step 4: start making cotton balls and glue them onto the ballerina's tutu. For the hair you can cut half a circle the size of the head and then cut a piece to make the bangs.

step 5: glue the different shapes together as shown in the image below.

step 6: use markers to add eyes and a mouth. You can add as many accessories as you like!

The ballerina or her ballet slippers do not need to be perfect. Dancers can enjoy this fun kid's craft with minimal time and supplies needed. And these can be used as book marks or to play with in the car as well!
The best age for a papercraft ballerina project typically ranges from 5 to 10 years old.
Ages 5-6: Younger children in this age group may need more assistance with cutting and gluing, but they will enjoy decorating the ballerina and creating the tutu. It’s a great activity to help develop their fine motor skills and creativity.
Ages 7-8: Kids in this range are usually able to handle most of the steps independently, including cutting out shapes and layering the tutu. They might also enjoy personalizing their ballerina with unique designs and colors.
Ages 9-10: Older children may take the project to the next level by adding intricate details and using more advanced techniques, like creating a multi-layered tutu or adding 3D elements. They can also use this craft as part of a larger project or display in a dance studio or in their room. No matter how your child uses this ballerina paper craft they will have so much fun!
This beautiful ballerina craft is flexible enough to be enjoyable for a wide range of ages, with younger kids focusing on the basics and older kids exploring more detailed and creative aspects. Be sure to enter your email address at the bottom of the post so you do not miss out on endless crafts and a lot of fun!
Creating a papercraft ballerina is not only a fun and engaging activity for kids but also a wonderful way to introduce them to the world of ballet and the beauty of dance. This craft project allows children to express their creativity while developing important skills like cutting, gluing, and designing. Best of all, the end result is a beautiful ballerina that they can proudly display or even use as a decoration for a ballet-themed party or bedroom. So, gather your supplies, set up your crafting station, and let your child’s imagination twirl with this delightful DIY project! Happy Crafting.
